Today I’ve decided to do something different and make a star field Photoshop tutorial! We’re going to go through the process of creating a star field together. I’ve never written a Photoshop tutorial before, and if I were to guess, I’d say I’m going to end up rambling quite a bit. I have at least a few hours to invest in this project today, so that should give me plenty of time to put something interesting and detailed together. Here we go!
Alright, so first off I’m using this Wacom tablet to do everything I do in Photoshop. If you don’t have one, and I’m sure most people don’t, it’s not too big of a deal I would imagine. I find it a lot more comfortable and precise to use than a regular old mouse, but I’m sure you could do your space scene using a traditional mouse without too many issues, if any at all.
Secondly, I’m using Photoshop CS6. For a couple years there I was using CS5 but at this point I couldn’t tell you the difference between the two. It’s been so long since I used a different version of Photoshop that I don’t remember what advancements Adobe made with CS6. I just want to make it clear though that if you’re not using CS6, it’s likely that some of the tools and settings I use could be hidden away in a different place. So keep that in mind if you’re having trouble finding something.
Panel 1
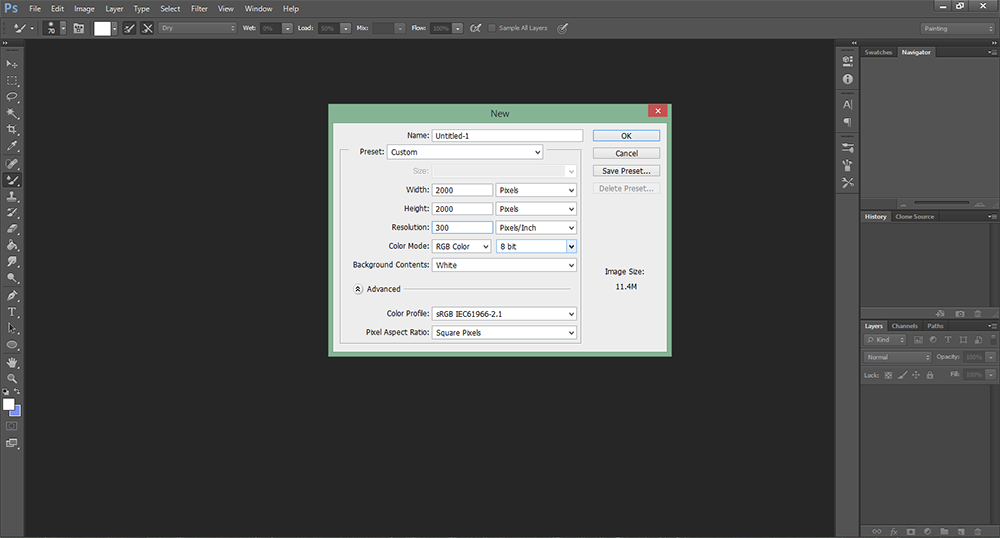
The first thing we’re going to do is open a new document. I’m going with a 2000 x 2000 pixel document, with 300 dots per inch. This is pretty much what I always start with as far as the general settings are concerned. I’m using a decent laptop right now, and sometimes when I go over 4000 x 4000 and use my favorite brush – the mixer brush – to do some serious painting type stuff, it chugs along a little bit at times. If you think 2000 x 2000 might do that for you (and 2000 x 2000 is actually a pretty big canvas), you can always go 1000 x 1000. You should be just fine following along with everything if you decide to go with a 1000 x 1000 sized document.
Of course, when it comes to computers, everything is subjective really. I feel my laptop is more than powerful enough for me, but it could never run any serious video games from the past few years. It’s just used as my Photoshop machine, more or less. Oh yeah, the reason why we want to go big when it comes to document size is so that we can pack as much detail as possible into our image. When I view one of my star fields at 100% size, it’s amazing how much detail is actually in there.
In the bottom right of the page, where your layers hopefully reside comfortably (they are for me!), there’s a tiny circular button you can press to fill backgrounds with solid color, gradients, etc. We want to fill the page with a solid black. (NOTE: I made a second layer called “Star Layer”, as you can see in the pictures, but it’s not necessary. I just do it out of a complicated habit I have. Call it OCD I guess) Then you can go ahead and name that layer “Small Stars” by double clicking on “Color Fill 1”. It’s nice to keep things organized, especially if you’re like me and you could possibly be making a whole bunch of layers by the time you’re finished.

Panel 2
So now you have your new “Small Stars” layer. Make sure that layer is selected, and open up our Filter menu at the top there. Choose Noise and then Add Noise. If it asks you to rasterize the layer, go ahead and do that. We need Gaussian, with the Amount set at about 10%, and make sure Monochromatic is selected. We don’t want no rainbow stars. Not today anyways.
Next, we’re going to do some subtle adjustments to the same “Small Stars” layer. Go up to Image in the top menu, then select Adjustments, followed by Brightness/Contrast. You can mess around with this however you want, but today I’m setting my brightness to -30, and the contrast to 75. (NOTE: I’m just wondering about this now while I’m editing this post , but hopefully you have the “Legacy” option in the Brightness/Contrast window, because you need to select it. Maybe if you have an older version of Photoshop, it’ll look the correct way for you. For me, in CS6, I need to select Legacy in order for it to look the way we want it.)
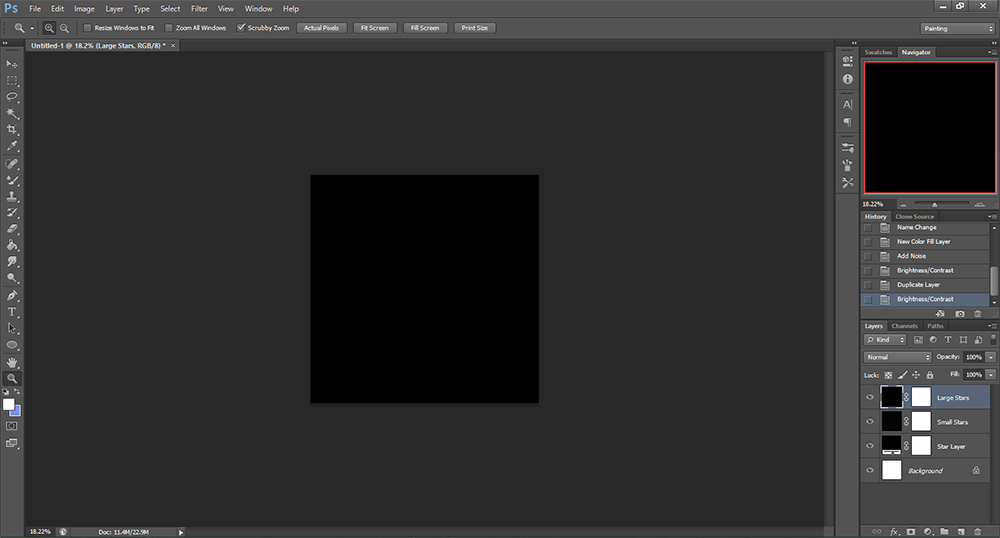
Right click on your “Small Stars” layer and choose Duplicate Layer, let’s name it “Large Stars”. Make sure this new layer is selected, then go right back up to Image, then Brightness/Contrast, and let’s set brightness to -100 and contrast to 50. (NOTE: Use Legacy, if you have it)
Panel 3
By the way, if you’re working with a rather large image like I am (2000 x 2000) and you’re not viewing it at 100% (in the bottom left of your document you should see the % displaying your viewing magnification) then in order to get it to 100% quickly you can just double click the magnifying glass on your tool bar there on the left and you should be viewing it at 100%. You’ll see it is starting to look like a star field already, right? Then you can double click the hand tool to go back to a view you can work with.
Now, use the magnifying glass to zoom out so your page looks something like mine here in panel 3. Hold ctrl and press t. This will allow you to transform this “Large Stars” layer. Hold shift + alt and then grab hold of one of the corners and stretch the layer to roughly about double the size it was previously. (NOTE: Holding shift and alt helps to keep the transform mode easily manageable. You can try the re-sizing without pressing either key and see the difference) When you’re done re-sizing make sure to click the check box at the top there to finalize your changes.
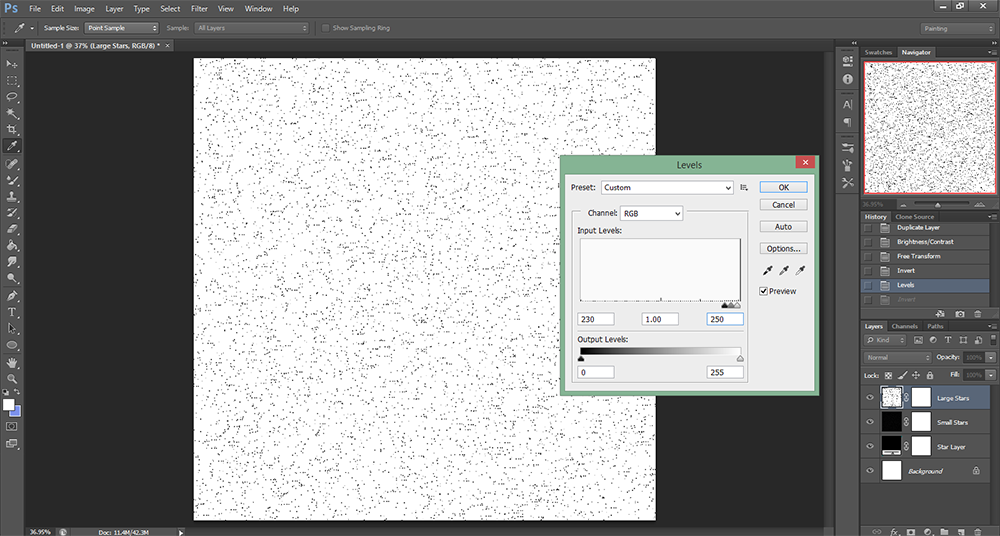
Panel 4
Okay, you want to see something weird? Press ctrl + I right now to invert the colors of your “Large Stars” layer. I find this makes it easier to see what I’m doing when I’m working on these tiny specks. Alright, now press ctrl + L to open the Levels menu (or you can go to Image > Adjustments > Levels) and input some numbers here to change some of the light values. You can absolutely experiment however you’d like, but if you want to play along with what I’m doing exactly, then input what you see in Panel 4 (230 1.00 250), then go ahead and revert the colors again with ctrl + I.
I’m sure I’m not the most productive person when it comes to how to do things in Photoshop (this is my first tutorial after all) so rather than go back and redo something and then rewrite what I’ve written so far in this post, let’s just do something together here. Zoom out a bit once again, like before. Let’s press ctrl + t once again (still on the “Large Stars” layer), and while holding shift + alt let’s re-size this layer once again. This time just shrink the box enough so that it’s just a bit bigger than the actual document. So maybe shrink it to about half way than what it was a moment ago. We still want these stars to be bigger than the other layers we have.
Panel 5
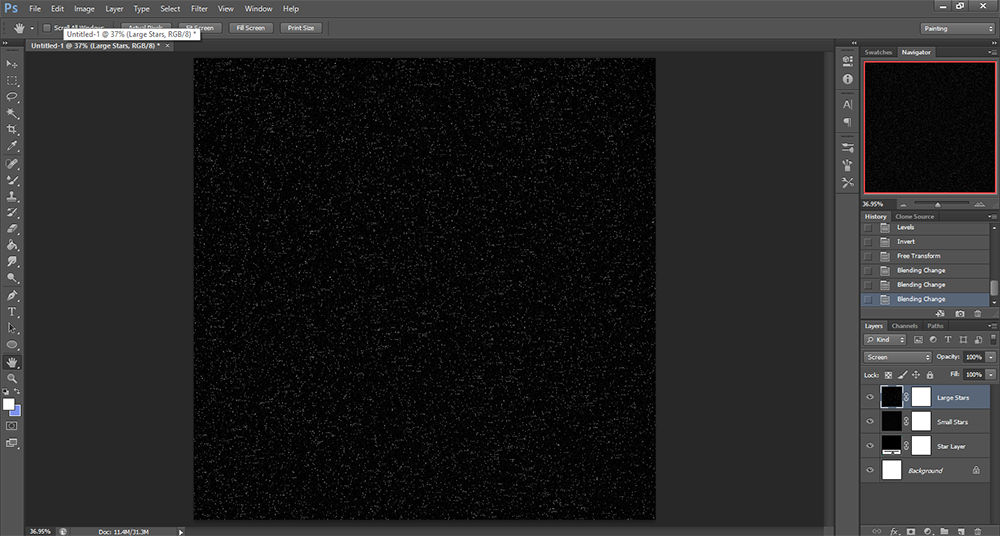
Alright, now you might have been wondering why we even made the other layer underneath the “Large Stars” one we’ve been working on, right? Well now we’ll get to kind of blend them together. Let’s change the “Large Stars” layer’s mode to Screen. The option is right there by your layers, right next to the opacity % in a drop down menu type thing. Now our “Small Stars” layer shows right through into the “Large Stars”. It helps me to remember what Screen does by thinking of a screen door effect. Remember, double click the hand tool on the left to zoom so the image fills your view, then you’ll be able to see the stars a bit more clearly. Or, like before, double click the magnifying glass to see an up close view. Looking spiffy?
Panel 6
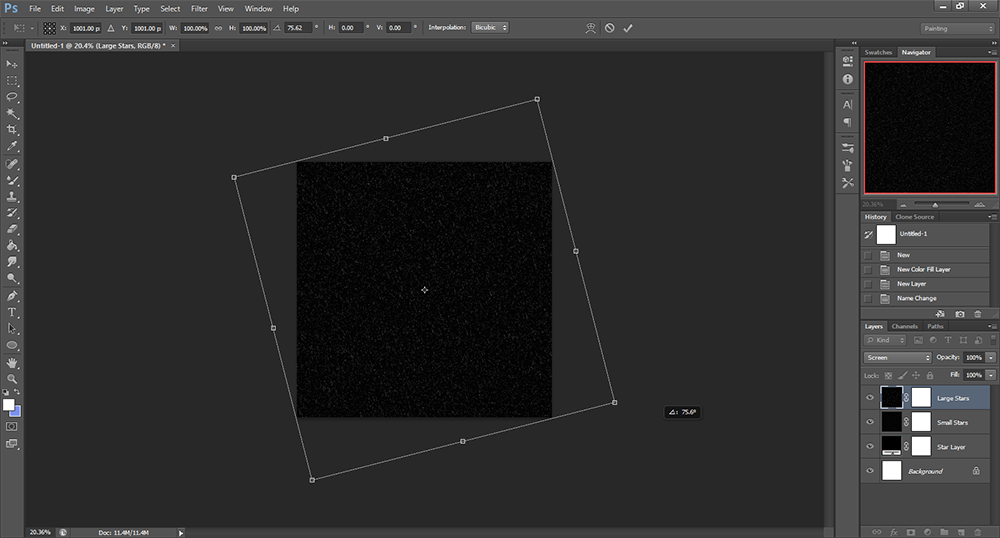
Alright, let’s zoom back out with the magnifying glass a bit like in Panel 6. Again, press ctrl + T, while the “Large Stars” layer is still selected, to get the transform going again. This time we’re going to hover just off one of the corners of the transform box until you see your icon change to a rotation symbol. We want to rotate this layer about 75 degrees, making sure that your rotated image stays within the boundaries of your document. Okay, that even confused me a bit. Take a look at Panel 6 to get an idea.
You’ve probably been wondering, “So, buddy. When do we actually start painting stuff?” Well, buddy, how about right now? Kinda, anyways. We’re going to use the eraser and make sure to erase a bunch of these large stars. There are supposed to be fewer large than small, so let’s get to it!
I use a soft fuzzy edged “brush” for the eraser. Just go around setting up patterns and feeling your way around the image. It helps me to imagine star clusters as I go. Don’t forget, you should zoom in at 100% while you do this. Or at least zoom in a bit, if 100% is too much.
Also, I should mention that this can take quite awhile if you’re using a rather small eraser brush on a large canvas. Don’t worry about being too accurate right now, because you’re going to be doing a lot more paint brushing very soon. So just do whatever you feel like doing at this point. Use a big brush, a small brush, whatever. Have fun and don’t get stressed out about it! 🙂

Panel 7
Okay, now let’s smush everything together so we can get working on the image on a great big canvas. Go up to Layers and then select near the very bottom, Flatten Image. Scary, I know. We’re going to lose our layers. Now you should just have your “Background” layer in your layer menu. Filled with stars.
Okay, now choose the Clone tool with a fuzzy brush. I chose one that was 90 pixels wide. You can choose whichever you feel like using. Now, you can hold alt and select a spot on the canvas to choose which spot you’d like to clone. Then, when you draw normally, while using the Clone tool still, you kind of well… clone the spot that you selected. I almost constantly change the area in which I’m cloning by going back and forth holding the alt key. You don’t want to make patterns easily noticeable by the Human eye.
Remember, this is the only layer we have right now, so if you used the eraser tool right now it would erase everything, including the black background. If you want to add some pure black spots, just use a regular black (I prefer fuzzy) brush. Then you can even try cloning that! Here’s what I have at this point. You can click it to make it full sized, if you’d like.
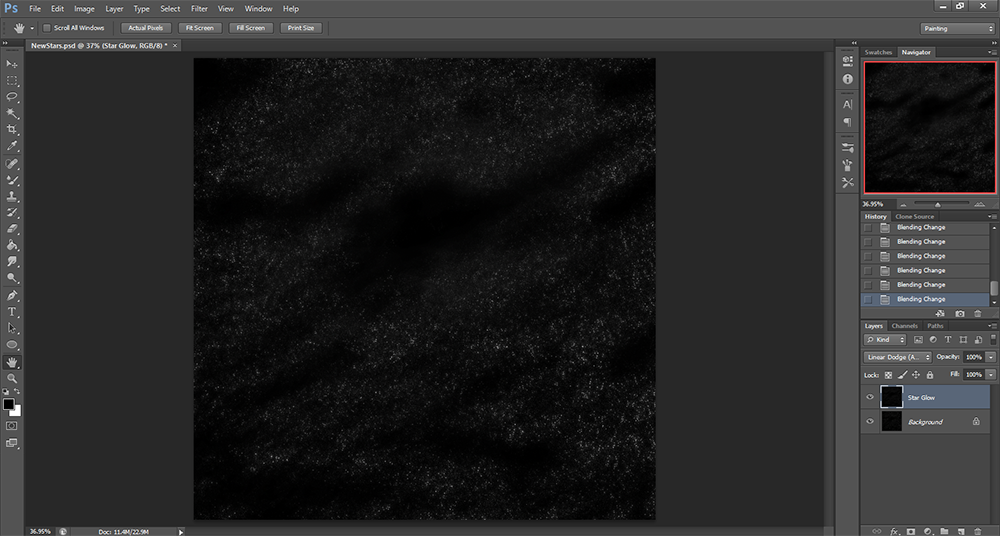
We’re not quite done yet. I mean, this is looking pretty good so far, but we can still add more. We have just that one “Background” layer still, right? Go ahead and right click on that in the bottom right layer menu there, and choose “Duplicate Layer”. I’m going to name it, “Star Glow”. After that, go up to Filter, Blur, and then choose Gaussian Blur. For the radius I chose a 7, but I mess around with that usually. As I tend to do for most of these settings. Today, we’re going with a 7 for radius though. Then press OK. Now change the mode (remember, that’s next to the opacity in the layers section on the right) for our “Star Glow” layer to “Linear Dodge (Add)”.
 We’re just about finished. I’m going to add some slight color to these stars though by pressing ctrl + B to open up the color balance menu and messing around with a few settings to give it a bit of a red tinge. Frankly, at this point you can edit your star field however you’d like. I’m going to duplicate this “Star Glow” layer, ctrl + T to enlarge it and rotate it a little bit, set the layer mode to screen, then ctrl + b to change the color balance of this new layer to give it a bit of purple in there too.
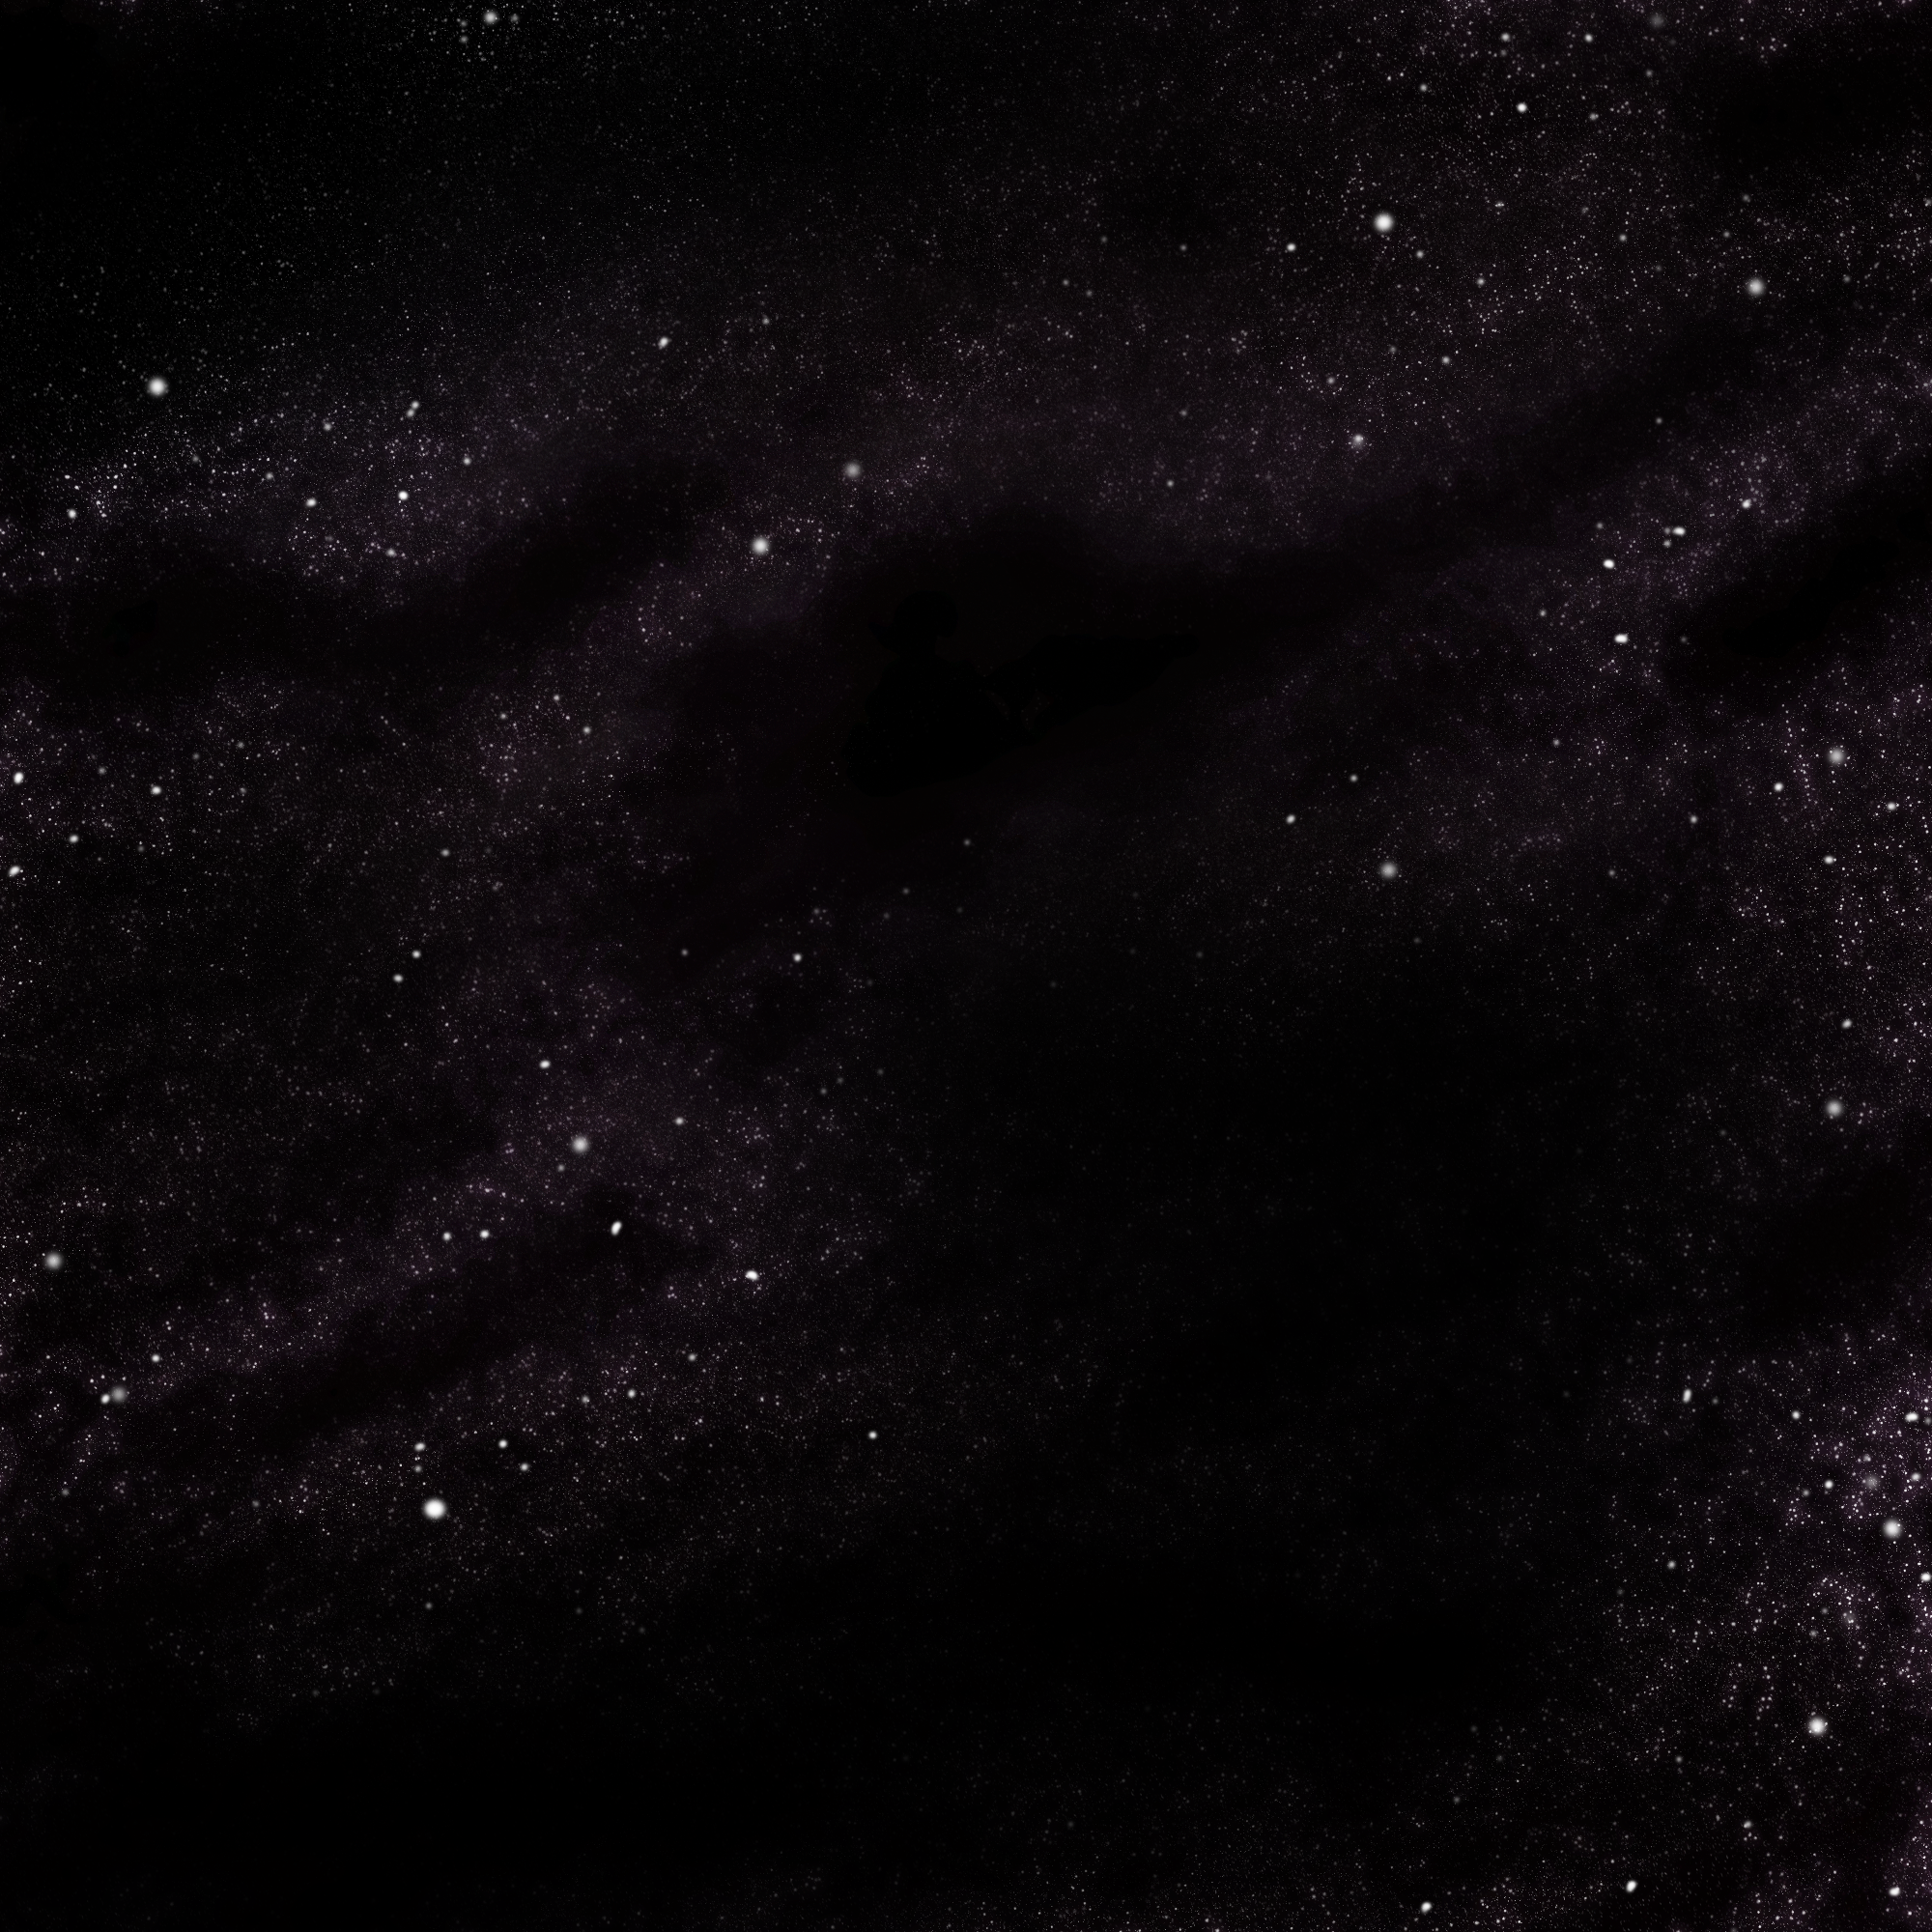
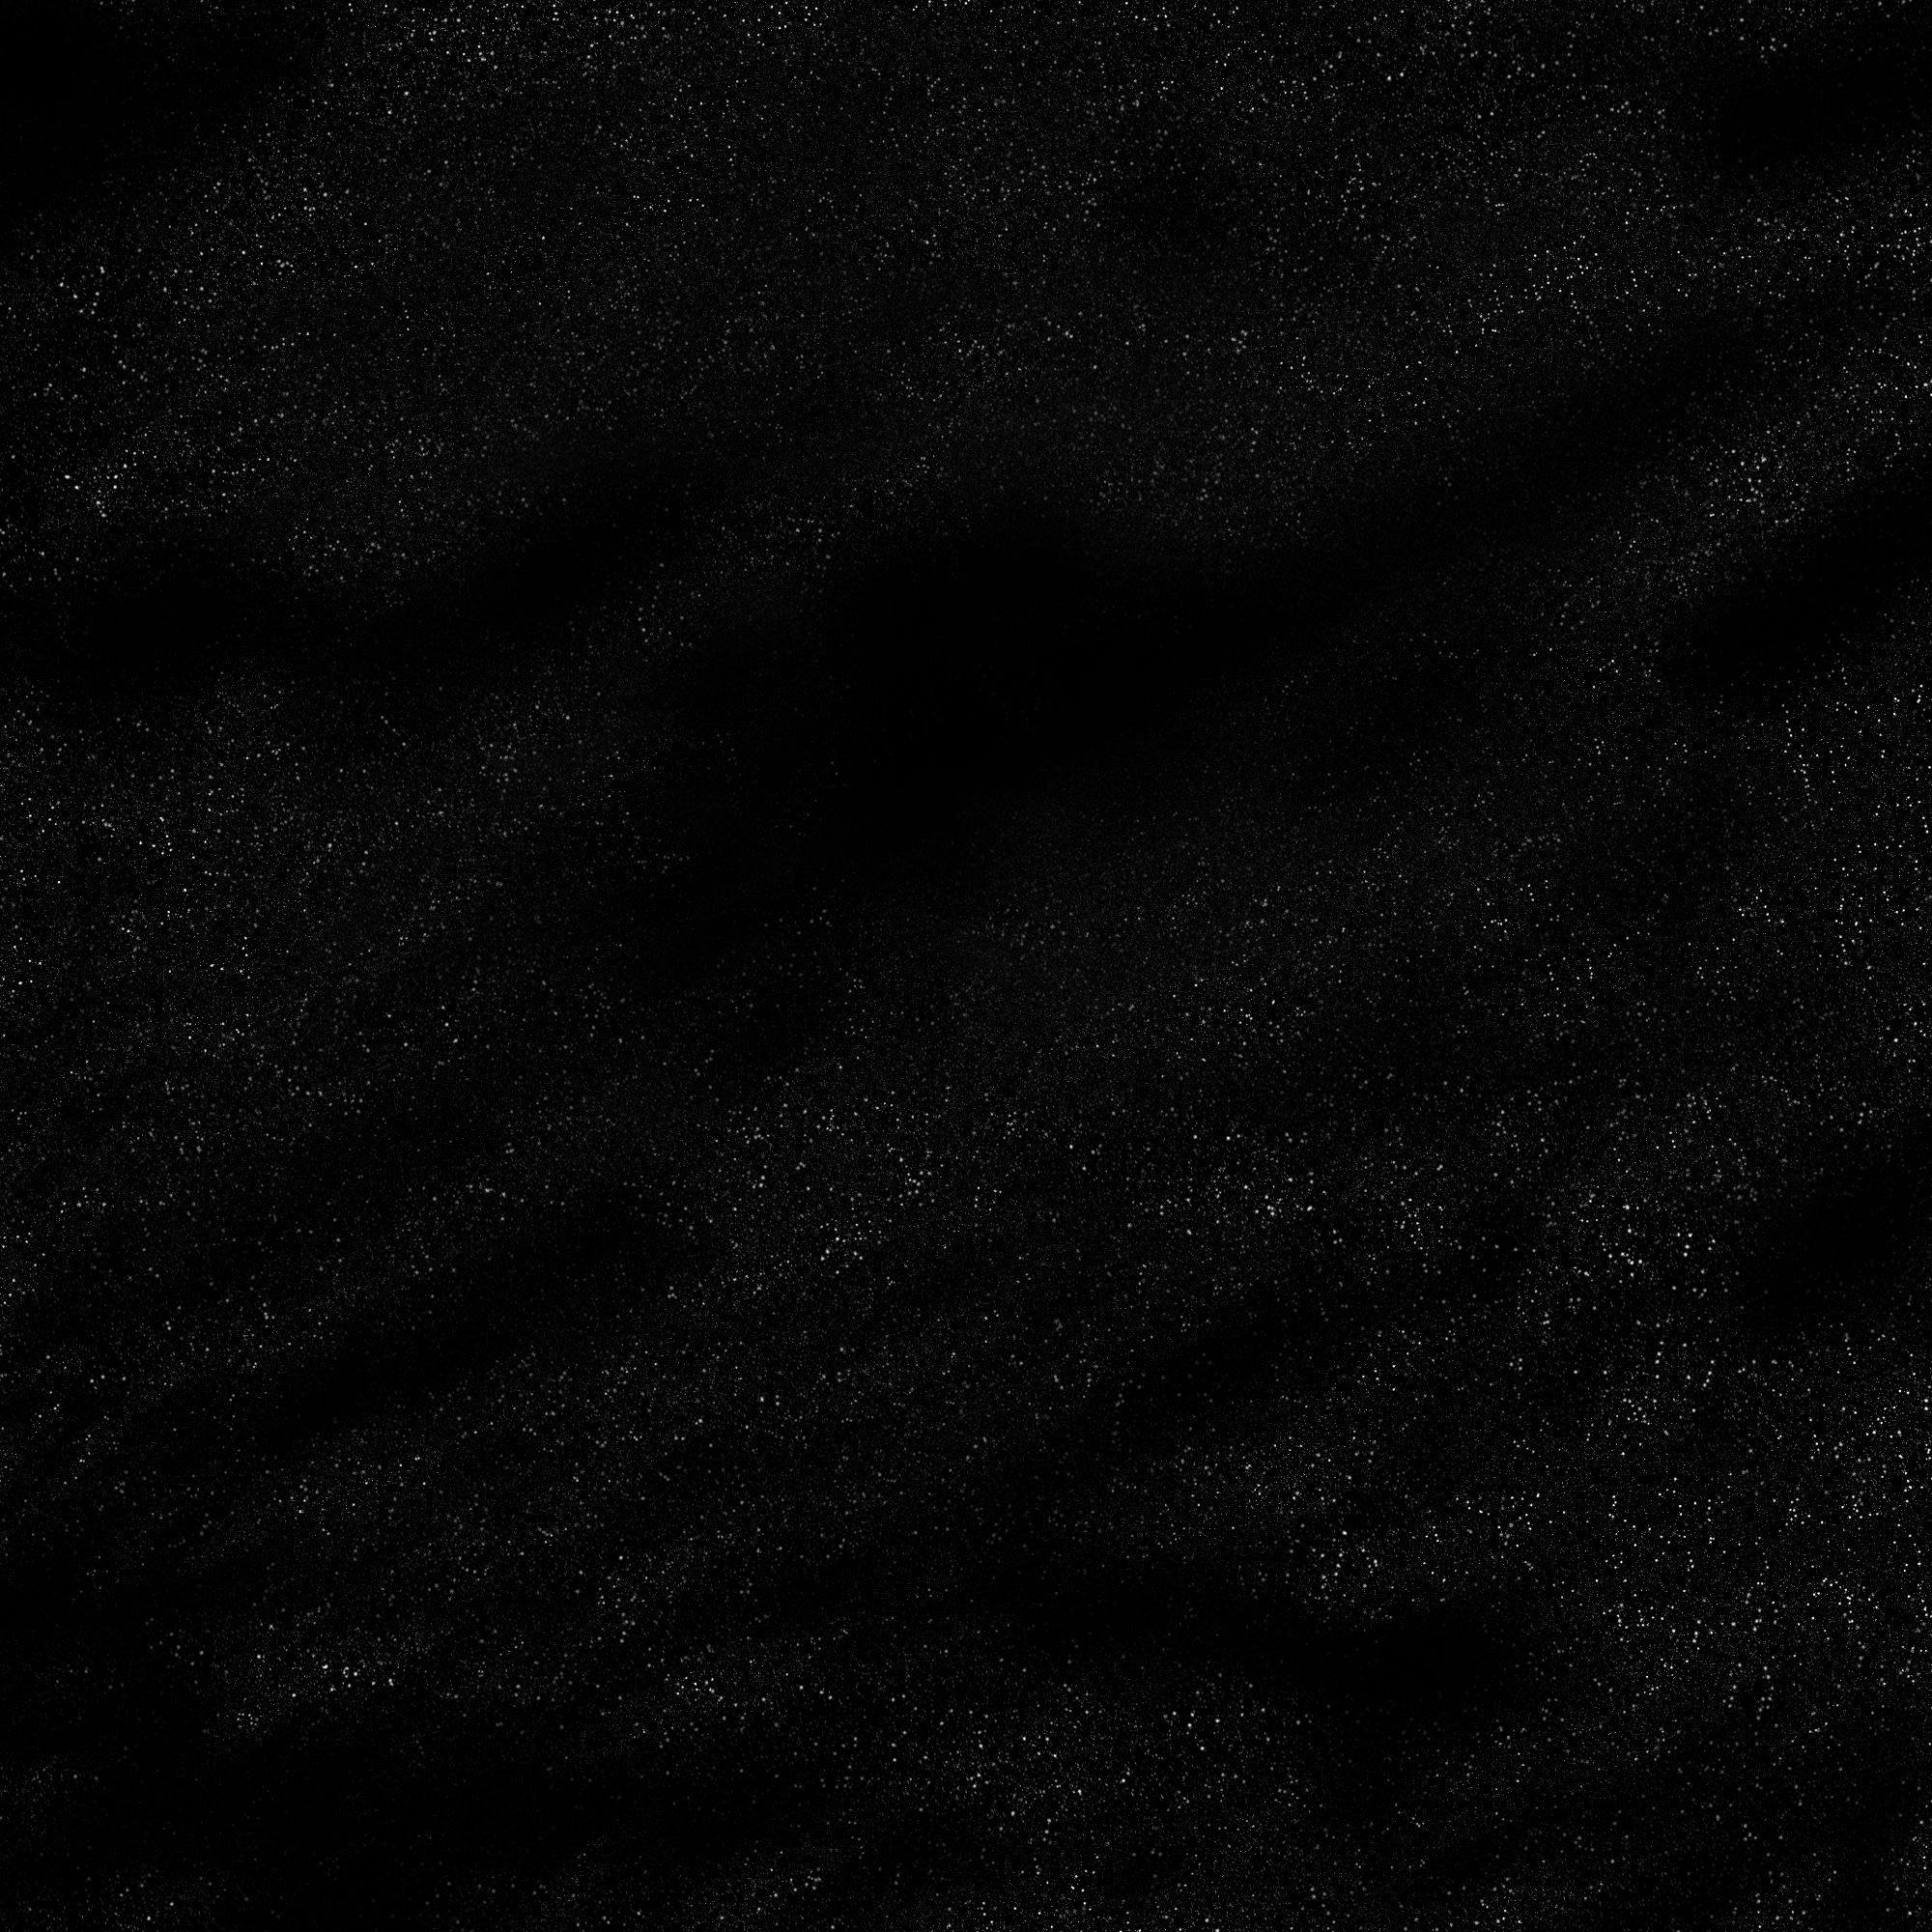
There are so many wonderful directions you could go in at this point. I added a few brighter stars in there, added a lot more black space with a fuzzy brush, and used the clone tool some more. The header image is what I ended up with when I was finished. I have no idea if anybody even tried this tutorial out, or even read through it! Thanks for checking this out. I really hope it wasn’t too confusing >< Tips and suggestions are so appreciated it’s not even funny. Take care! 😀
Help support my creative habit by liking, sharing, or commenting on my posts! Visit me on the Facebooks! Or, if you like, click right here! to help support me and my creative habit financially. Any and all assistance is greatly appreciated! 🙂

Pingback: Photoshop Planet Tutorial: Day 264 - Robert's Creative Habit()